
How to Make Pizza Dough Without Yeast and Self-Rising Flour.A Guide to Quick, Crispy Crusts
How to Make Pizza Dough Without Yeast and Self-Rising Flour: A Guide to Quick, Crispy Crusts
To make pizza dough without yeast or self-rising flour, combine all-purpose flour, baking powder (or baking soda + acid like yogurt), salt, olive oil, and warm water. Mix until a shaggy dough forms, then knead briefly until smooth. This method relies on chemical leavening for a quick, often crisp crust, ready for baking almost immediately without any proofing time.
Introduction: The Unsung Hero of the Home Kitchen
Pizza night. It’s a cherished ritual for many, a beacon of delicious comfort food. But what happens when you’re craving that perfect pie, and your pantry is missing key ingredients like yeast or even self-rising flour? Does the dream of a homemade pizza crust instantly crumble? Absolutely not. While many recipes emphasize the slow rise of yeast or the convenience of pre-leavened flour, a truly fantastic pizza dough is well within reach using basic pantry staples, offering a different, equally satisfying experience.
Read More: ২০২৬ সালে অর্থসহ ইসলামিক দোকানের সুন্দর নামের তালিকা
I’ve been in that exact spot more times than I care to admit. The sudden, undeniable urge for pizza strikes, but then a quick inventory reveals an empty yeast jar or a flour bag that’s just plain all-purpose. For a while, I thought this meant ordering takeout, which is fine, but it lacks the personal touch, doesn’t it? Then, through some experimentation – and perhaps a little stubbornness – I discovered how surprisingly simple it is to whip up a dough that delivers a delightful crust without either of those standard components. It’s a real game-changer when time is short or ingredients are limited.
This isn’t about compromising; it’s about discovering an alternative that brings its own distinct advantages to your pizza game. We’ll explore how to bypass the waiting game of yeast fermentation and the specific blends of self-rising flour, opting instead for a method that’s remarkably quick and yields a crust with a lovely texture. Prepare to redefine your understanding of homemade pizza dough and embrace a world where spontaneity rules the kitchen.
So, forget the limitations. Get ready to gather a few common items you likely already have, and let’s embark on a journey to create a pizza crust that’s not just good, but genuinely impressive. You’re about to unlock a secret that will make pizza night an effortless reality, whenever the craving hits, with nothing more than regular flour and a couple of clever tricks.
The Unexpected Secret to Yeast-Free, Self-Rising Flour-Free Pizza Dough
Many home cooks might believe that a fluffy, flavorful pizza crust is synonymous with yeast, or at the very least, the convenience of self-rising flour. This is a common but somewhat narrow view. The truth is, some of the most satisfying pizza experiences come from doughs that skip both, relying instead on chemical leavening agents that act much faster and can provide a wonderfully crisp texture. It’s a method that deserves far more credit than it typically receives, especially when time is a factor.
Why Skip Yeast and Self-Rising Flour?
The primary reason for avoiding yeast is often time. Traditional yeasted doughs require a proofing period, sometimes several hours, to allow the yeast to activate and produce gases that create a light, airy structure. Self-rising flour, while convenient, isn’t always on hand, and its pre-mixed leavening might not offer the precise control you desire. Opting for a yeast-free, self-rising flour-free dough means instant gratification. You mix, you roll, you bake. There’s no waiting, no proofing, and frankly, sometimes a crispier, denser crust is exactly what the pizza demands.
Dispelling Common Misconceptions About No-Yeast Dough
A frequent misunderstanding is that pizza dough without yeast or self-rising flour will be tough, cracker-like, or lack flavor. While it won’t have the same open, airy crumb as a long-fermented dough, it doesn’t have to be a flavorless brick. On the contrary, this style of dough can achieve a delightful crispness, a satisfying chew, and a robust flavor profile, particularly if you’re mindful of your ingredients and technique. The goal here isn’t to replicate a Neapolitan pizza, but to create a fast, delicious, and reliable homemade pizza experience distinct from its yeasted cousin. It’s about recognizing the inherent qualities this unleavened or chemically leavened dough offers and leveraging them to your advantage.
Understanding the Science: How Your Dough Will Rise
Without yeast to produce carbon dioxide or the pre-mixed leavening in self-rising flour, our quick pizza dough relies on a different scientific principle for its lift. This isn’t magic; it’s basic kitchen chemistry, and once you grasp it, you’ll feel much more confident in your ability to create a perfectly acceptable crust.
The Role of Baking Powder and Baking Soda
The heroes of our no-yeast, no-self-rising flour mission are baking powder and, occasionally, baking soda. Baking powder is a complete leavening agent, meaning it contains both an acid and a base, plus a starch. When it gets wet, and especially when heated, it reacts, producing carbon dioxide gas that gets trapped in the dough, causing it to puff up. Most baking powders are ‘double-acting,’ meaning they get a small lift when mixed with liquid and a second, more significant lift in the heat of the oven. Baking soda, on the other hand, is just a base. It needs an acid (like buttermilk, yogurt, lemon juice, or even cream of tartar) to react and produce gas. Often, recipes will call for a combination or just baking powder, which simplifies things quite a bit.
Acidic Activators: Beyond Just Water
While warm water is perfectly fine for activating baking powder, introducing an acidic liquid can elevate your dough even further, especially if you’re using baking soda. Liquids like plain yogurt, milk with a splash of vinegar or lemon juice, or even sparkling water (the carbonation adds an extra boost) can create a more vigorous reaction with baking soda, leading to a lighter crust. These acidic components don’t just help with rise; they can also add a subtle tang and tenderness to the dough. Understanding this interaction gives you control, allowing you to fine-tune your dough’s texture and flavor based on what you have in the fridge and what kind of pizza you’re aiming for.
Essential Ingredients for Your Quick Pizza Dough
The beauty of this method lies in its simplicity and reliance on common kitchen staples. You don’t need exotic flours or specialized leavening agents. Just a few basic items, and you’re good to go.
All-Purpose Flour: The Unsung Hero
All-purpose flour truly is the backbone of this recipe. It’s accessible, versatile, and has just the right protein content to give our dough structure without making it overly tough. Since we’re not relying on yeast to develop gluten over time, the brief kneading required with all-purpose flour is usually enough to create a dough that’s pliable and holds its shape. Don’t be tempted to swap it out for cake flour or bread flour without understanding how that might impact the final texture; all-purpose provides a good balance.
The Right Liquid: Water, Milk, or Yogurt?
Warm water is the default and works perfectly. It helps hydrate the flour and activate the baking powder. However, experimenting with other liquids can impart different qualities. Using milk (warm, please!) can yield a slightly richer, softer crust. Plain yogurt, as mentioned, brings acidity, which works wonderfully with baking soda (if used) and contributes a lovely tender texture and a very subtle tang. I’ve found that using half water and half yogurt often gives a beautiful balance. The key is to ensure your liquid is warm, not hot, as this helps everything mix smoothly and react gently.
Fats and Seasonings: Flavor and Texture Boosters
Olive oil isn’t just for drizzling; it’s crucial in the dough itself. A good quality extra virgin olive oil adds richness, helps tenderize the dough, and contributes to that desirable golden-brown color when baked. It also makes the dough a bit easier to handle. Salt is non-negotiable for flavor; without it, your crust will taste flat. Beyond that, don’t hesitate to add a pinch of garlic powder, onion powder, or even dried oregano or Italian seasoning directly into the flour mixture. These subtle additions infuse flavor right into the crust, making every bite more interesting and elevating your homemade pizza game significantly. It’s a small detail, but one that makes a big difference.
Your Step-by-Step Guide to Crafting Yeast-Free Pizza Dough
Alright, let’s get down to business. Making this dough is incredibly straightforward. It’s a process that emphasizes speed and efficiency, making it perfect for a weeknight meal or an impromptu gathering. There’s no complex terminology or lengthy waits involved; just simple mixing and forming.
Gathering Your Tools and Ingredients
First things first, make sure you have everything at hand. You’ll need a large mixing bowl, a whisk or fork, a sturdy spatula or wooden spoon, and possibly a clean surface for a quick knead. For ingredients, round up your all-purpose flour, baking powder (and/or baking soda), salt, olive oil, and warm water (or your chosen liquid). Having everything measured and ready to go is half the battle won, and it makes the entire process feel much smoother, like you’re a seasoned chef already.
- 2 cups (about 240g) All-Purpose Flour
- 2 teaspoons Baking Powder (or 1 teaspoon Baking Soda + 1/2 cup Plain Yogurt/Milk with a dash of vinegar)
- 1 teaspoon Salt
- 2 tablespoons Olive Oil, plus extra for greasing
- Approximately 3/4 cup (180ml) Warm Water (or warm milk/yogurt for richer dough)
The Mixing Process: Achieving the Perfect Consistency
In your large mixing bowl, whisk together the dry ingredients: the all-purpose flour, baking powder (and/or baking soda), and salt. This step is important to ensure the leavening agent is evenly distributed throughout the flour, guaranteeing a consistent rise. Make a well in the center of the dry ingredients. Pour in the olive oil and about two-thirds of the warm water (or chosen liquid). Using your spatula or spoon, begin to mix from the center, gradually incorporating the flour from the sides. You want to mix until a shaggy dough forms. Add the remaining water slowly, just a tablespoon at a time, until the dough comes together and mostly pulls away from the sides of the bowl. It might still be a little sticky, and that’s perfectly fine; we’re not aiming for a dry, crumbly dough.
Kneading (or Not Kneading) for Success
Unlike yeasted doughs that demand extensive kneading to develop gluten, this dough requires minimal effort. Once your shaggy dough has formed, turn it out onto a lightly floured surface. Knead it gently for just 1-2 minutes. The goal here is simply to bring the dough together, ensure all the ingredients are fully incorporated, and create a smooth, pliable ball. Over-kneading will develop too much gluten and can lead to a tough crust, which is the opposite of what we want for a quick pizza. Trust me on this one; a light touch is your best friend here. If it feels too sticky, add a tiny bit more flour, but be sparing.
Shaping the Dough for Your Perfect Pizza
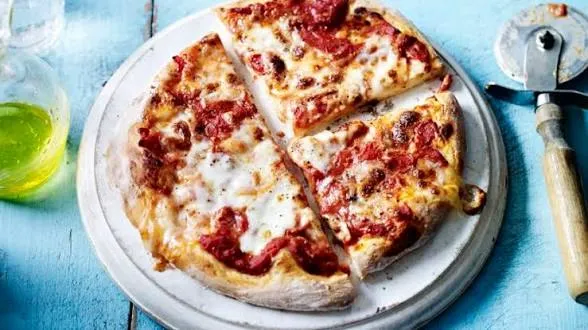
Now for the fun part! Lightly flour your work surface and your hands. Take your dough ball and, using a rolling pin or even just your hands, begin to stretch and shape it into your desired pizza crust thickness and shape. A round shape is traditional, but a rectangular sheet pan pizza works just as well. I often find that pressing it out with my fingertips gives a nice rustic feel. Aim for about 1/8 to 1/4 inch thick. This dough doesn’t expand dramatically like yeasted dough, so the thickness you roll it to is pretty much what you’ll get. Place your shaped dough onto a lightly oiled or parchment-lined baking sheet or pizza peel dusted with semolina flour.
Baking Your Masterpiece: Tips for a Crispy Crust
Getting a crispy crust with this type of dough is incredibly achievable, often more so than with some yeasted varieties. The key lies in high heat and proper preparation.
Oven Temperature and Preheating
This is critical. You want your oven screaming hot. Preheat your oven to its highest setting, usually around 450°F to 500°F (230°C to 260°C). Allow it to preheat for at least 30 minutes, or even an hour, to ensure the oven (and any pizza stone or steel you’re using) is thoroughly heated. High heat quickly sets the crust, promoting crispness and preventing it from becoming soggy, especially with moist toppings. Think about it: a quick shock of heat is what creates that ideal texture.
The Role of a Pizza Stone or Baking Steel
If you have one, a pizza stone or baking steel is an absolute game-changer. Place it in the oven during preheating. These surfaces absorb and retain a tremendous amount of heat, transferring it directly to the bottom of the pizza dough, which is essential for a truly crispy bottom crust. If you don’t have one, an inverted heavy baking sheet placed in the oven during preheating can work as a decent substitute. Just make sure it’s substantial enough to hold heat. Baking directly on a cold baking sheet will yield a less crispy result, a mistake I’ve certainly made in the past.
Topping Strategies for Quick-Bake Crusts
Because this dough bakes relatively quickly, you need to be strategic with your toppings. Go light! Overloading the pizza with too much sauce, cheese, or watery vegetables can lead to a soggy crust. Thin layers are your friend. Spread a thin layer of sauce, sprinkle cheese evenly, and use drier toppings. If using vegetables with high water content (like mushrooms or spinach), consider pre-sautéing them briefly to remove some moisture. Fresh herbs should be added after baking for maximum flavor and color. This thoughtful approach ensures your perfectly crisp crust isn’t undermined by excess moisture.
Troubleshooting Common Issues
Even with a straightforward recipe, minor hiccups can occur. Knowing how to address them means you can always salvage your pizza night.
Why is My Dough Too Sticky?
A sticky dough is often a sign of too much liquid. Flour absorption can vary depending on humidity and the type of flour, so don’t fret. The fix is simple: add a tablespoon of flour at a time to your dough, kneading it in gently, until it’s manageable and no longer excessively sticky. It should be soft and slightly tacky, but not clinging to your hands or the counter. If you’ve gone too far and it’s too dry, a tiny drizzle of olive oil can help bring it back to life.
Why is My Crust Too Hard?
A hard crust usually points to one of two things: over-kneading or too much flour. Over-kneading develops too much gluten, making the dough tough. If you suspect this, remember for next time to keep kneading minimal (1-2 minutes). If it was too much flour, the dough would have been quite stiff from the start. Ensure you’re measuring your flour correctly (lightly spooning it into a measuring cup and leveling, rather than scooping directly from the bag). Also, baking at too low a temperature for too long can dry out the crust, so crank up that oven!
Getting that Perfect Crispness
If your crust isn’t as crispy as you’d like, several factors could be at play. The oven temperature might not have been high enough, or it might not have been preheated long enough. A preheated pizza stone or baking steel makes a huge difference here. Also, consider the moisture content of your toppings and sauce – less is often more. Sometimes, a quick trick is to par-bake the plain crust for 5-7 minutes before adding sauce and cheese. This gives the base a head start in crisping up before the moisture from toppings can interfere.
Creative Variations and Enhancements
Once you’ve mastered the basic dough, don’t stop there! This dough is a canvas for culinary creativity.
Flavoring Your Dough: Herbs and Spices
Infusing flavor directly into the dough can elevate your pizza significantly. Before adding the liquid, stir in a teaspoon of dried Italian herbs, garlic powder, onion powder, or a pinch of red pepper flakes for a subtle kick. Freshly ground black pepper or even a touch of smoked paprika can add wonderful depth. Imagine a garlic-herb crust paired with a simple Margherita, or a spicy crust underpinning some pepperoni. The possibilities are vast, and it’s a simple way to customize your pizza experience.
Different Liquids, Different Textures
As we discussed, using different liquids can change the dough’s texture and flavor profile. Try using buttermilk for a tangier, slightly more tender crust (it also reacts wonderfully with baking soda if you’re using it). Carbonated water (like seltzer or club soda) can contribute a lighter, airier texture due to the extra gas bubbles. Even a small amount of beer can add a unique malty flavor, though be mindful of the liquid quantity. Each liquid brings its own character, inviting you to experiment and find your personal favorite.
Gluten-Free Alternatives (brief mention, if relevant to core topic)
While this article focuses on traditional all-purpose flour, it’s worth noting that similar no-yeast, chemically leavened doughs can be made with gluten-free flour blends. These often require slight adjustments in liquid content and can sometimes benefit from binders like xanthan gum. The core principle of using baking powder or soda for leavening remains the same. If you’re exploring gluten-free options, look for blends designed for baking, as they often contain a mix of flours and starches that mimic wheat flour’s structure.
Frequently Asked Questions About No-Yeast Pizza Dough
Making pizza dough without yeast or self-rising flour opens up a world of quick and easy homemade pizza. Here are some of the most common questions people ask when trying this method.
Can I prepare this dough ahead of time?
This dough is best used immediately after mixing and a brief knead. The leavening agents (baking powder/soda) start reacting as soon as they get wet. If you let it sit too long, the gas produced will escape, and your crust might not rise as well. For optimal crispness and rise, mix and bake within 10-15 minutes.
Will this dough be as chewy as traditional yeasted pizza dough?
Generally, no. Yeasted doughs develop extensive gluten networks during proofing, contributing to their characteristic chewiness and airy structure. This no-yeast dough tends to be denser and crisper. It offers a different, but equally satisfying, texture that is often preferred by those who enjoy a thin, cracker-like crust.
Can I use whole wheat flour instead of all-purpose flour?
You can, but it will affect the texture. Whole wheat flour is denser and absorbs more liquid, potentially resulting in a heavier, tougher crust. If you opt for whole wheat, you might need to add a bit more liquid (a tablespoon or two) and be prepared for a less pliable dough. A good compromise is using a 50/50 blend of whole wheat and all-purpose flour.
What’s the best way to get a crispy bottom crust?
High heat and a preheated surface are key. Use your oven’s highest setting (450-500°F/230-260°C) and preheat for at least 30-60 minutes with a pizza stone or baking steel inside. If you don’t have one, an inverted heavy baking sheet preheated in the oven works as a substitute. Also, go light on the sauce and toppings to prevent sogginess.
Can I bake this pizza directly on the oven rack?
While technically possible, it’s not recommended for the best results. Baking directly on a rack without a preheated surface underneath can lead to a soft, undercooked bottom. Using a preheated pizza stone, steel, or even a hot baking sheet provides the intense, direct heat needed to cook the bottom quickly and achieve crispness.
How long does this type of pizza dough take to cook?
Given the high oven temperature and the nature of the dough, this pizza bakes very quickly. Typically, it will be done in 8-15 minutes, depending on your oven and the thickness of your crust and toppings. Keep a close eye on it; you’re looking for a golden-brown crust and melted, bubbly cheese.
The Art of Making Pizza Without the Wait
We’ve traveled through the ins and outs of crafting a delicious pizza dough without the usual suspects: yeast and self-rising flour. What we’ve discovered isn’t merely a workaround; it’s a legitimate, often superior, method for specific pizza styles and circumstances. This approach empowers you to create spontaneous, satisfying meals with ingredients already in your pantry, proving that you don’t need specialized supplies to make something truly special.
Embracing this technique means gaining a new level of culinary independence. No longer are you beholden to proofing times or specialized flour types. Instead, you have the power to create a crisp, flavorful crust in minutes, making pizza night a spur-of-the-moment decision rather than a planned event. I sincerely hope you take these ideas and run with them, experimenting with different liquids, seasonings, and toppings to discover your perfect quick-bake pizza. There’s a real joy in making something from scratch, especially when it’s this easy and delicious. Happy baking!